Showing posts with label my pattern. Show all posts

Wednesday, April 20, 2022

P3 – Pants Pattern Perfection

P3 pants - Pants Pattern Perfection self-drafted pattern
P3 pants – self drafted pattern

Way back in 2017, I was on a mission to create the perfect fitting pants. While I admit I still haven’t cracked it, with this latest pattern draft I’m about as close to it as I think I can get. So I’m stamping it FINAL.


The pattern pieces look so misshapen compared to a regular pattern (eg, baby-got-back, who knew?), but the resulting fit speaks for itself. Most of drag lines are gone, and they are snug without being tight. The test is sitting - yes, I can, comfortably. I should add I’ve also converted the pattern from stretch fabrics to plain weave fabrics, as these are my preference.


For this final version, I’ve gone with a convention trouser style by moving the zip to the centre front with a fly, added side pockets, and created a shaped waistband with belt loops.


Made in another lite-weight wool fabric score from the Sallies for $3, it’s midnight blue with a self-stripe. Once again, they are lined to the knee.


Very, very happy with the results, and glad I persevered, even if its taken 5 years to get here!

Sunday, November 8, 2020

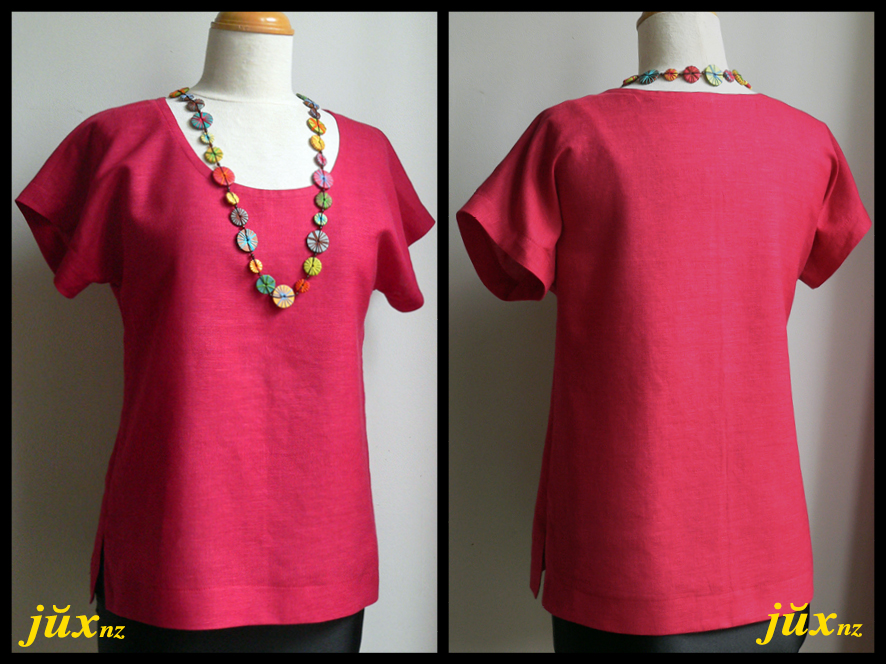
Lemon Squeezy - red linen blouse

The other piece of fabric which sprung to mind when thinking of new blouses was the remnant from this shirt.

Lemon Squeezy - red linen blouse, self-made pattern
Using the same self-made pattern as this white broderie anglaise blouse, I simply squared off the armholes and hem, then cut bias strips for both them and the neckline.

Easy peasy, lemon squeezy!

Sunday, July 26, 2020

The Nirvana Sweater

If there was one thing I was determined to finish during lockdown, it was this sweater for SunnyJim.

The Nirvana Sweater

It's been knocking around since last year, picked up and abandoned several times in favour of "newer, shiny things". To be honest, I disliked working with the yarn (from Spotlight), even though it's a lovely colour and 100% wool, it was heavy, and not particlarly soft to handle.

I made the pattern up as I went along, and decided on the basket weave front to stop me dying of boredom while knitting. So much knitting!

However, once I handed it over, he loved it immediately and nicknamed it his "Kurt Cobain sweater" (even pulled out his guitar and had a noodle). He puts it on almost every evening shortly after walking in the door, these nights have been so chilly.

Must admit, it's not my best work, but it's DONE.

Thursday, March 5, 2020

Teal blue wool bouclé "Melba" cropped jacket


Started in 2013, this self-drafted jacket, called the "Melba" (because it's based on my memory of a wildly expensive jacket seen in Melbourne) was made up to the point of deciding whether to make Spanish Snap buttonholes, or machine keyhole buttonholes. After languished for seven years, I'm over it and just want it gone. Machine buttonholes it is.
The fabric is a heavy wool bouclé originally from The Fabric Warehouse.


Maybe if I'd finished it in 2013 I'd wear it, but I really can't see myself in it now, so it will go to Ziggurat in a few months, when they are taking winter stock.

Monday, March 2, 2020

Pink pom-pom beach poncho from a blanket *tutorial*


Orginally a $5 polarfleece baby blanket complete with pom-poms from Countdown supermarket.
The only pattern piece I used was for the hood. Any hood pattern piece will do - in this case Butterick 6101, as it was still out on from the teal hoodie. Pockets were drawn straight onto the fabric by tracing around my hand.
I've illustrated a chart to help explain the process.
  1. Cut a strip off one side just wide enough for the hood and two pockets. TIP: cut these with their openings on the finished edge to save time hemming.
  2. Hem the main piece along the cut edge, then fold into quarters. Cut a quarter-circle hole out of the folded corner for the neckline. The finished circumference size needs to be the same size as the lower hood neck seam length.
  3. Sew all pieces together using a zigzag stitch. You may need to stretch the neck edge a little when attaching the hood to make it large enough to pull over your head.


It's not my best work, but it took less than an hour to make, and is a perfectly functional poncho for the beach.

Tuesday, January 28, 2020

Take 4 - the pants edition

Pinstriped pants and matching cat!
During a de-stash last year, (which saw me sell 4 boxes of fabric no longer "sparking joy" at Fabric-a-Brac) I came across three trouser length pieces of lightweight wool - one black, one navy, and one brown with blue pinstripe, each $3 at the Sallies some years earlier, and 5 metres of $5 per metre "fire-damaged" grey wool/cashmere from Pete's Emporium.  (A good wash and line-dry in the wind shortly after purchase got rid of a faint damp/smoky odour).
Desperately needing to replace my black work pants after 6 years of wear, I grabbed my favourite self-made trouser pattern, and promptly cut all four fabrics, plus lining to the knee for each. 
Then they languished for months, until my sewing bee a few weeks ago.

Since returning to work this year, they've all been worn at least once, and will be fabulous when the seasons turn towards the cooler months again.
Each a welcome addition to my wardrobe.

Monday, June 12, 2017

A perfectly practical skirt

Read any article about "Wardrobe Essentials" and it will prescribe a "black pencil skirt". Meh. How about a navy-blue A-line skirt instead? With pockets, of course.
Belt from David Jones, shoes from I Love Paris
The pattern is a very old one I made myself, with a few adjustments. Originally high waisted (ahh, the '90's!), it now has a waistband and belt loops. And pockets. Navy blue wool fabric is yet more left-overs from the nehru-style suit made ages ago for SunnyJim - I've already made another skirt out of the scraps. While I now haven't the foggiest where it came from, I do remember it was reasonable price, hence buying more than needed for the suit.
While I don't love this skirt, it's practical for work, and as a consequence is on fairly high rotation in my wardrobe. It can be worn with multiple blouses, and looks great with a pair of brown opaque tights and shoes from I Love Paris dyed brown using Waproo leather dye.

Tuesday, March 7, 2017

White broderie anglaise blouse

I had a hankering to make a simple broderie anglaise blouse to pair with a vintage black lace circle skirt I've owned for years. I found the ideal fabric in The Fabric Warehouse - 100% cotton with embroidery that's not too foufou.


An hour or so on Pinterest helped refine the look. Fortunately, I was able to base the blouse on a couple of patterns from the stash. There were enough changes to each pattern to warrant making my own, using the body (and sleeve) from Butterick 6811 and the neckline from New Look 6754. I also curved the sleeve edge on the drop shoulder and hems at the side seams to add a little more interest.


A quick and easy make with french seams, rolled hems, and a bias bound neckline.
The fabric, after a couple of washes, has now lost most of its starchiness, giving the blouse lovely drape and softness.


Thursday, March 2, 2017

Flying purple people eaters

A little over a year ago, I blogged about a pile of UFOs in my stash. I'm happy to say that apart from No 1 - the wool "Melba" jacket, I've now completed all of them, and even better, haven't added to the pile. Did having photographic evidence of my 'crime' motivate me into action?


The latest to be completed is No 3, "Perfect Purple Pants". They're really the second toilé in my quest to make the perfect fitting pants. They were cut in November 2014 straight after completing the first draft (so, so bad!), but have since languished unmade for 2 1/2 years. Vintage Simplicity 3082 was the starting point - why, I don't know, I have heaps of better fitting patterns. Maybe I wanted to look as rockin' in my pants as the women with the beehive on the envelope? I envision hers are gold brocade - awesome!


Clearly, I've lowered the high waist down to the natural waistline. I also added back pockets and simplified the ankle split (see insets), and made many, many fitting tweaks. The fabric is stretch cotton sateen, bought in a Spotlight sale. Wouldn't be my first choice colour-wise, but it was cheap, and the pants will be fine for India (with a butt-covering shirt, of course!).
I'm pretty happy with the resulting fit. There are still a few drag lines around the knees but I think I've found a fix for those, so we'll see in if it works on toilé No 3.

Tuesday, January 17, 2017

New workhorse - navy capri pants

There was a little under a metre of fabric left after making this dress, just enough to make a pair of capri pants.

Using a tried and tested self-made trouser pattern, I shortened it by 30cm, curving the hems at the side seam for a bit of interest. To put them on, the pocket opens out, then buttons close. Easy-peasy.
Necessary, but not exciting sewing.

Update
I didn't explain the pocket closure very well, did I? Will a few more pictures help?
(Apologises for the fluff. Washed with a tissue, grrrh!)
I also found a very old pattern with quite good diagrams instructions.

See, it's really quite simple!

Thursday, January 12, 2017

It's not you, it's me - floral skirt fail

It started life as a 50's inspired frock.
But it wasn't working for me.
"Maybe lose the bodice and make it a skirt", I thought.

But it still it's still not right.
Sigh.
The problem was the dress was something I would have worn a decade ago, (and why I had difficulty finishing it in 2011) but the skirt regressed it even further - back to the clothes I made for myself in high school. 
No, just—no.
Finished, it will be heading to charity soon.

Wednesday, June 25, 2014

How to make dress shields - removable and reusable!

Dress shields attach to the underarms of a garment protecting it from perspiration stains. I make and use them regularly for garments made in precious fabrics I don't wish to wash/dryclean more than necessary, such as "Jeannie’s wool houndstooth dress".
Claire B Shaeffer briefly describes how to make them on pages 132/3 in her book "Couture Sewing Techniques" but I have a slightly different technique worthy of a tutorial.
First, gather your materials. You'll need a dress, blouse or jacket pattern (any womens' size, armhole scyes are pretty much consistent), pen or pencil, paper (newspaper will do), pins, soft cotton fabric (I'm using old pillowcases here), thread, sewing machine, sewing needles, and 8 domes (sew on snap fasteners). Plus a garment to attach them to!

Take the front and back bodice pieces of your pattern and pin them together at the side seam. Pin onto the paper (newspaper) and trace the underarm seam from front (B) to back (A) notches (approximately 18cm/7 inches).

Remove pattern pieces and from the centre point (C), mark down about 10cm/4 inches (D). Freehand draw a nice scoop between points A, D and B. It doesn't need to be perfect - no one's going to see these! When your happy with the shape, cut it out.

Cut 4 of this shape out of your cotton fabric. Add an extra 1cm (or 1/2 inch) to the scoop edge and cut another 8 - if you're making shields to use in a jacket, you can cut half of these out of lining. This will make one pair of shields.

Place a small piece onto a large piece, matching armhole seams and sew around scoop edge. Do this to all 4 small pieces. Then sew 2 of these pieces together along armhole seam; and again for the other two. Sew the remaining pairs (without smaller bits) together along armhole seams. Clip and press seams open.

Now make a pair of shields by matching the halves with smaller bits to the halves without. Make sure the smaller bits are sandwiched between the layers. Overlock/serge or zigzag around the whole outside scoop edge.

Next, make a cup of tea, put on your favourite DVD and put your feet up for some hand sewing! Sew one side of domes (snap fasteners) at points A, B and D (there will be double D's (tee, hee) on each shield) and its partner onto the garment in the corresponding points, which should be approximately 10cm down each side seam, 10cm down each underarm seam, and at front and back armhole notches. Snap together and you're done!


If you need a bit more protection you can increase the number of smaller bits sandwiched in the middle, or use a layer of winceyette or light towelling instead.
Also, sewing the shields in thread the colour of your garment makes it easier to match back to the correct garment when they come out of the laundry.

Tuesday, May 27, 2014

Merino cardigan from the scrap bag

Some time ago I made this tunic top with lace inset. 
I'm not sure where the merino came from originally, but it must have been relatively cheap, because there was quite a bit left-over in the stash, enough to make a semi-fitted cardigan.


I made the pattern by tracing a sweater onto paper, then cutting a bit off the bottom of the pattern for a hip band, a bit off the centre fronts for front plackets (mainly because there wasn't quite enough fabric, otherwise I would have extended the fronts to create fold back facings), a bit off the sleeves for cuffs and did some dodgy arithmetic to work out how long the neckband needed to be. If you try this method for yourself, remember to add seam allowances before you cut your fabric.
Czechoslovakian glass buttons complete the cardigan - a wonderful find in Taupo of all places!

If your wondering why my mannequin is covered in black lycra, I've finally put a little junk in her trunk, using this tutorial and a bunch of old shoulder pads. Garments hang much better now she has a realistic shape!

Merino cardigan from a snagged jersey

One of my cats is a “Hemingway cat”. Amazing as his big paws are, he has problems shedding the claws on his extra digits. If they haven’t been clipped in a while, he snags soft furnishings, carpets, clothing. Demonstrated here.

Unfortunately, a fairly new jersey of Sunny's fell victim to a loving cuddle with snaggle-puss, and was rendered unwearable by a big hole and ladder down the front.
Too good to throw out, I recut it into a bolero style cardigan for myself. The pattern is one of my own, adjusted to fit the confines of the original jersey, including extra seams in discreet places (like the facings) because there was only just enough fabric. I’ve got no idea where the fastenings came from, they've been hanging out in "the trims stash" for so long.
 Since finishing last week, I've wore it several times already, it's so versatile. A welcome addition to my wardrobe.

Thursday, October 4, 2012

Leaf Patch for Jeans - free pattern!


My comfy old jeans have for some time now been relegated to wearing only while gardening or cleaning the house. They recently got a hole in the knee, but because there’s still life left in them, I’ve patched them.
I made the leaf template/pattern myself by scanning a leaf I found in a park, then tracing over the image in Adobe Indesign. Feel free to download the attached jpg (simply click on the image and copy/drag to your desktop) to use for yourself - its scaled to fit an A4 page.


Patching is a great way to use up your favourite scrap fabrics, and you can pretty much use any fabrics (ok, probably not chiffon!) - simply fuse lighter weight fabrics to give them more body, and if you do this before you cut them out, you halve the amount of cutting you’ll need to do.
Using heavy duty machine thread in a contrasting colour, attach upper leaf bits to lower leaf bits using a zigzag stitch on a regular sewing machine. I set the stitch length fairly short (2 on my Elna) and the stitch width at the widest setting (4 on the Elna) because I still wanted it to look like zigzag, but be tight enough so the fabric wouldn’t fray too much.


Make it easier to attach patches to the jeans by splitting open the side seam (the one with no top-stitching).
(At this stage, I put a patch on the back to make it super strong for kneeling down in the garden, etc, but you can skip this bit.)


Hand baste the patches in place. Once your happy with the placements, zigzag around the whole outside, then zigzag any raw edges inside to complete the leaf shapes.
Finally, re-sew the side seam, and enjoy!


Time = 3 hours approximate.
Let me know how you get on - I’d love to see your results!