Wednesday, October 30, 2013

Away to the camels!

Camels? WTfudge?
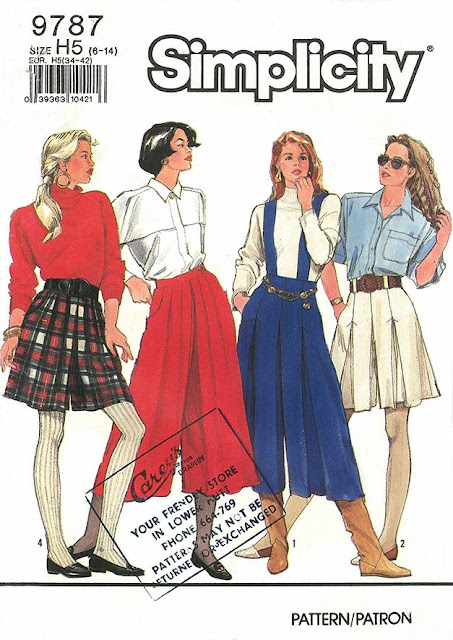
I’m off to India for a month at the end of the year, and my journey includes a camel trek into the desert at Pushkar. It seemed the perfect opportunity to make a pair of 'camel riding' culottes.

When I found this pattern - Simplicity 9787 - in St Vinnies earlier this year, it seemed like divine intervention, as I'd been hankering after a pair of seaside culottes I'd seen in a movie set in the 1930's. View 2 fits the bill perfectly.


The linen was picked up from Arthur Toyes for 50% off during their summer sale, but is now gun-metal grey, thanks to another bout of dyeing. Finishing them very, very shortly!


New Look 6071 and the floral sundress

Buying fabric is exciting. The little thrill of creativity that strikes when you see it. Touching it. Getting inspired to make that something you can’t live one more moment without. 
Often I buy fabric with only a vague idea of what I’ll make from it. When I get home I race to hunt out the perfect pattern, hoping there’s enough.
The first time I made NL 6071 two years ago I used an old Indonesian batik sarong. It quickly became my favourite summer frock, so comfortable and easy to wear, with just enough va-voom at the décolletage for me. Now it’s getting very thin its been worn so much. Time to make a new one.


Two and two came together when I saw this floral cotton in
The Fabric Store (previously Global Fabrics).
Both times I’ve made NL 6071 I’ve completely ignored the pattern is designed for stretch fabrics, because by carefully measuring pattern pieces, cutting a couple of sizes larger than “my size” and adding a zip, it can be made out of non-stretch fabric. I also lengthen the skirt by 10cm to a more “lady-like” length, and this time added short sleeves.


Did I mention it’s easy to make? Seriously, the bust wrap twisty thing is no where near as hard as it looks.
I love it so much, I’m even posting a ‘selfie’ wearing it to work yesterday, taken during my lunch break on the Petone wharf in a föhn wind (just caught the tripod before it blew over).

necklace and earrings = Trade Aid, sunglasses = ZenniOptical
watch = Skargen, purple suede pumps = Coopers Shoes


Sunday, September 29, 2013

Vogue 5782 meets Andy Warhol

Second choice for The Monthly Stitch September’s “Vintage Patterns” challenge is the truly vintage Vogue 5782
You may recall I’ve toiléd a variation of this pattern before. My intentions are to make it up in a very precious piece of vintage wool given to me by my favourite tutor a couple of decades ago, but felt I needed to toilé the whole dress properly first. 
The polished cotton fabric was bought in the August sale at The Fabric Warehouse - the same day I attended the fantastic Andy Warhol:Immortal exhibition at Te Papa. The random splashes of cyan and magenta on otherwise fairly monochromatic grey/olive reminds me of his work.
Two changes were made to the pattern. I moved the zip from centre back to sideseam as I find zips easier to do up at the side, and the neckline is wide enough to slip my head through. It does still need a zip - because - as per the pattern - the waist seam is gathered onto tape cut to my exact waist measurement, and - you know - boobs/bum > waist. The second change was to make the ties into a belt, instead of coming from the side seams. This way I can wear it with other belts.
Probably because of my rusty pattern grading skills I also need to look at my armhole scye, as it seems quite tight this time. The sleeve head has plenty of ease so it should be a fairly easy adjustment to cut the armhole a little larger. And I love this sleeve length! Plus, the pattern has pockets in the sideseams. (Yes, I did put the zip in behind the pocket).
I made a bit of a boo-boo last weekend and bought some more fabric. Never fear, it will become a frock in Froctober! It’s not technically “stashed” if it doesn’t make it into the “stash”, is it?

Monday, September 23, 2013

Burda 7253 and the SwirlyWhirly Sackdress

When The Monthly Stitch announced September’s challenge was “Vintage Patterns”, my first choice to make was Burda 7253 - a retro style sackdress. However, even thought the sackdress or ‘waistless chemise’’ - first presented by Cristóbal Balenciaga in his 1956 collection - would be classed as “vintage”, I’m not sure this Burda pattern is. Bought from Spotlight last year, nowhere on the pattern does it say it is a re-print from the ‘50-’60’s. It does have an extremely tapered hobble skirt just like the original sackdress style from the 60’s, which makes me think it is a re-print, rather than retro-styled.
Anyway, once I threw away the very confusing construction instructions, this frock was a dream to make. In fact, apart from the handstitching, it only took a few hours to make. The fabric is from "the stash" - a soft cotton/silk blend from The Fabric Warehouse, a little opaque so it’s french seamed and lined with cotton lawn (also from TFW). I shortened the pattern to just below the knee (instead of mid-calf). If (when) I make it again I’ll do away with the zip and centre back seam - it easily slips over my head with the zip closed so why go to the bother!
I’m looking forward to the weather warming up so it can be worn. Have a feeling it’s going to become a ‘comfy’ favourite like the twist-top dress from the summer before last.
Belt = Kinki Gerlinki, Melbourne.

Monday, September 2, 2013

Another round-to-it

Finally finished these pants last week.  Original cut and started last winter, I’m not sure why it’s took me so long - I’ve already worn them twice, so there was definitely a need for them in my wardrobe. Oh well.
Black wool suiting fabric from The Fabric Warehouse. Ankle boots from I Love ParisRed top here.

Monday, August 5, 2013

The perfectly timed Cape Challenge

It’s the perfect time of the year for wearing a cape - too warm for a coat, yet not quite warm enough to go completely without that extra layer.
I’d been thinking about making a capelet since seeing one in Melbourne last month. Upon returning to Wellington, and knowing a capelet wouldn’t use much fabric, I rummaged through the scrap bag(s) and turned up the last of the wool suiting used to make a béret for the ANZAC day parade, some navy-blue rayon lining, and a bag of brown suede scraps I’d completely forgotten about. 
An old cloak pattern (available here) was the starting point for the capelet pattern plus the pattern piece made for the fur collar on my Mad Men Jacket.  I simply shortened the cloak pattern in length and rounded the collar points to make them easier to bind.
A couple of Sundays stitching, and here it is! The suede fastening is made using a D-ring from Made on Marion and a screw back button stud (similar to these) from an old vinyl belt. I actually made two fastenings, but decided it looked better with just the one.
Burda 7253 and the SwirlyWhirly Sackdress
Vogue 5782 meets Andy Warhol
On to the next Monthly Stitch Challenge - Vintage Patterns. Will it be retro Burda 7253’s “SwirlyWhirly Sackdress” (lets face it, Wellington’s been a bit swirlywhirly recently) or the truly vintage “Vogue 5782 meets Andy Warhol”? What do you think?

And take a look at The Monthly Stitch Collective to view everyone's creations.

Sunday, July 28, 2013

Sale madness in Melbourne

Picked an excellent time to visit Melbourne. Sales on everywhere, 50-70% off in most cases. However, mindful of my baggage limit on the flight home, I didn’t go completely crazy.
Except for Buttonmania. The sale was by weight; below cost Aussie $4.
Completely forgot to take swatches of all WIP fabrics before leaving NZ, but luckily did have some swatches with me in a notebook I always carry.
In no particular order:
  • green buttons match one of those swatches, couldn’t decide which style I liked best so hey! bought both
  • grey for coat fabric given to me by Auntie Muriel
  • black buttons are always useful
  • brown buttons either end because I liked them
  • buckles are for future projects
  • and how cute are the little two-toned cream and brown buttons in the centre.
There was just so much stock; I had to giggle when I opened a box and found a note inside “Didn’t get to this box - ran out of time!” I know the feeling.
Next time, just wait until next time!

Wednesday, July 17, 2013

These boots are made for walkin’

SunnyJim found some cheap flights and we’re off to Melbourne for the weekend! 
What a treat. Melbourne is my second most favourite city in the world (after Wellington, of course!) but I haven’t visited in about 7 years, thanks to the mortgage. Looking forward to checking out the old haunts and discovering some new ones.
AND will still be there on Monday for the start of the Buttonmania sale!
So packing the sensible shoes for all the walking I’m planning on doing - sorry beautiful red suede Minx boots, you’ll be staying in the closet.

Sunday, June 23, 2013

The wild week that was

I’m alive!
Worst storm in more than 40 years passed over New Zealand on Thursday night, Wellington bearing the worst of it. Fortunately, we were warned well in advance and no one was killed or injured. Damage though – oh boy! (Take a look at the images on the left under “Storm batters Wellington” link.)
Suffered a little damage ourselves –  a fallen tree in the backyard, thankfully it missed everything vital; part of the fence ended up on the neighbours driveway requiring a cleaning up; and a crack in a window which was sucked open by the force of the wind, not broken, though, so can wait another day or two before I call insurance – let the people who need it most get their claims in first.
Last night there was the most beautiful full moon. I took a shot of it as it was slipping over the hills this morning before I left for work.

Sunday, June 9, 2013

A round-to-it

Plaids, checks and stripes that don’t matched at seams bug me big time. I know sometimes its impossible to line them up completely – especially when you are a beginner, but to not even make an attempt is just sloppy and cheap and frankly amateurish. Its so common in store bought clothing (even “designer” clothing is not immune) that sometimes I just despair. Look away, Jux, look away!
When I spied this skirt in Petone’s St Vinnies I had to rescue it. Made by the now defunct Aotearoa House it features a lovely kōwhai embroidery on the front. But - OH - those checks! Fortunately it was a little on the long side so wouldn’t be indecently short once recut.
A few hours in the weekend unpicking, cutting and stitching, plus a good press and shave and I have a new winter skirt.
Plus I heard this old fav on the radio while weaving some magic.
Look Blue, Go Purple - “Cactus Cat”.

Tuesday, May 7, 2013

Winter stripes

With the weather finally turning, I spent the weekend preparing my wardrobe for winter, rotating my summer clothes with the winter ones, making sure everything is clean and not in need of repairs. Winter shoes and boots were removed from boxes and summer sandals cleaned and boxed away. A few things were removed completely to go to charity, and a couple of “round-to-its” have gone to the top of the mending pile - more on those soon.


The best thing about having a bi-annual closet clean is rediscovering loved garments. I made this pure wool knit striped sweater at the end of last winter, the coldest on record for more than 40 years (it actually snowed in Wellington!). It was worn on a regular basics immediately because it’s lovely and soft and toasty.


Two patterns were mashed up to make it - Simplicity 7084 for the body and hip tie, and Simplicity 8172 (from the ‘80’s) for the sleeves.


And check out the Mad Men Challenge big reveal over at JuliaBobbin. Such a talented bunch of ladies.

Monday, April 22, 2013

A béret for the dawn parade


Some of you may remember I rediscovered a jacket, made when I was 14, a few years ago and with a little tarting-up it’s back in my wardrobe.
Cleaning up in the weekend, I found the left-over fabric, so spent an enjoyable few hours on Sunday crafting myself a new béret. I used a pattern made years ago while studying milinery, but this one is similar (plus it has a tutourial). I plan to wear it to the dawn parade on Anzac Day (Thursday).
Kanzashi flowers (purple brooches clipped to hat) were from another project. The blue flower was made simply by turning through a bias strip of fabric and shaping into petals.
Brooch clips available from Made on Marion.

Wednesday, April 17, 2013

Stashbusting 1, 2, 3!

About 20 years ago, I made myself a dress from a length of scarlet red wool crepe in Vogue 2586 (View C). Much loved at the time, the dress was eventually packed away when I - ahem - outgrew it.
Fast-forward to last year, and in a fit of - well, maybe just a fit - I unwisely decided to chuck the bits of now unpicked dress into a dyebath (mistake no1 - never dye something thats been worn repeatedly - even if its clean - as its probably got residue stains not visible, but boy, are they there!) after I had already dye something else (mistake no2 - first article has already absorbed the best part of the dye). Result = lovely tonal version of the orginal colour, but blotchy, blotchy, BLOTCHY! Doh! Into the stash it went.
Anyway... after checking out this (linked to JuliaBobbin's Mad Men Challenge from last year) I had to have that pattern - Vogue 5782. The only one I could find online for sale was two sizes too big - but I know how to grade a pattern and I had to have it.
Pattern duly graded, I pulled the blotchy wool crepe out of the stash to toilé it in, figuring if I made it shorter and cut really carefully I’d be able to avoid the worst of the dark splodges, and maybe end up with a top I could wear.
You may notice there’s a seam across the bust. Because the front is cut on the bias, none of the bits I had were quite long and wide enough to cut it in one piece. As the bit I most needed to check on the toilé was the drape of the neckline, of course it had to stay on true bias, hence the seam. Also, the ties on the pattern are sewn into the side waist seams, but I extended these pattern pieces to make an actual belt.
It was impossible to avoid all the splodges though, so I’m thinking of perhaps tie-dyeing it somehow, although I do love the colour it is now. In the meantime, I’ve worn it a few times at night to dimly lit restaurants and a concert and no one seemed to notice. Really comfortable style, and can’t wait to make it in the ‘real’ fabric.

Tuesday, April 16, 2013

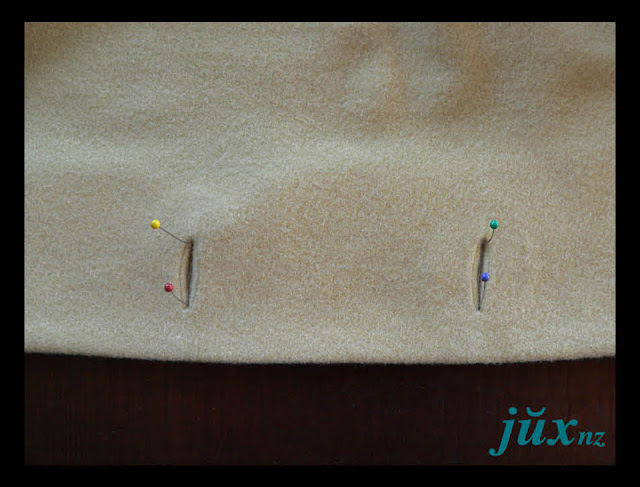
How to make Spanish Snap Buttonholes

Hey, you can teach an old dog new tricks!
I’ve been making bound buttonholes for years, but have often been frustrated at how large the “lips” are, no matter what I did to make them smaller.
Then last weekend I discovered Spanish Snap Buttonholes in a book I’ve had for ages “Couture - the art of fine sewing” by Roberta Carr. Now, I have to admit, I often overlooked this book in favour of others in my collection because of the photos inside - eyewatering 1980’s outfits (be aware!). I’m taking a fresh look at it now to see what other techniques it contains for future use.
I found these buttonholes were much easier to make than regular bound buttonholes. Here’s how:
First, make a oval template on a bit of cardboard 7.5cm (3 inches) by 5cm (2 inches). Make a rectagular box first, mark in centre lines and freehand the curves.
Find the true bias of your fabric (absolutely crucial to use the bias so the lips wrap correctly) and on the wrong side chalk the bias line, or use a basting stitch if you prefer. Centre your oval template longways on this line and mark up as many ovals as you need for buttonholes, plus one for a trial run.
Once you cut them out, mark the centre point of each oval, then measure and mark half the width of your button on each side of this centre point (longside). Mark out 3mm (1/8 inch) each side of centre point (shortside). These are the points you’ll stitch to in curved lines. You can chalk/baste the whole stitching line if you like.
Next, mark the position of the buttonholes on the right side of your garment. Centre each oval wrong side up over this line in the correct distance from the front edge for the size of your button; pin in place. In this example, my buttons are 28mm, therefore the ovals sit 1cm in from the front edge. (If they were much smaller, I imagine the ovals would extend past the garments edge.)
Now, using a small stitch length on your machine, stitch an ‘squinty eye’ shape with pointy ends. Slash through the centre and out to the points, being careful not to cut the stitching.
Turn through to the wrong side of garment, take hold of each end of the oval and tug once in a firm ‘snap’. Voila! The bias will wrap neatly around the seams and you have made a lovely buttonhole.
Press. I found I could press them to either have no lips or really narrow ones (which are demonstrated here).
If necessary, trim oval to sit back from the seam allowance.
(Ms Carr suggested pressing a little fusible web at each end to keep in place, but I didn’t bother, because once they’re stitched to the facings they’ll hold in place.)
As you can see, I’ve now sewn my jacket and attached the facings, but not the lining.
To make the buttonhole facings, place a pin in the corner of each buttonhole, right through the facing.
Flip the garment over and chalk/baste the buttonhole points onto the facing, using the pins as a guide. (If you look closely, you’ll see yellow-head pins pointing to my white chalk marks).
Cut retangles of fusible interfacing 7.5cm (3 inches) by 5cm (2 inches) – use those scraps you’ve been saving! Chalk/baste buttonhole markings onto the sticky side of the fusible, and pin to the facing, right sides together.
Once again, using a small stitch length on your machine, stitch an ‘squinty eye’ shape just past the chalked/basted points of the buttonhole. Before you cut, pin through the buttonhole to check again they’re lining up, then slash through the centre and out to the points, being careful not to cut the stitching.
Push the fusible through the hole, and trim to sit within the seam allowance. Carefully press fusible to the facing. (Of course a cat had to get in at least one picture!)
Line up your buttonholes and facings and pin and/or baste.
When you have finished your garment, slip-stitch the facings to the buttonholes.
Gorgeous!

Monday, April 15, 2013

Mad men challenge - Beth's fur collar coat

It’s finally rained a bit in Wellington, enough for the water restrictions to be eased - yay!
It seems a bit ridiculous making a wool jacket (Burda 7255) at the moment because its still very warm here for this time of year, but the jacket was going together like a dream – until the end – when I put it on the mannequin and realised it lacked a little something...
Taking a break, and catching up on some of last seasons Mad Men (new season starts soon!), I spied this:
(source)
My eyes flicked between Beth and the mannequin - that’s it! That jacket needs some fur!
So off to Spotlight I went the next morning and bought 30cm (12 inches) of fur in the closest colour - teddybear fur.
I re-cut the top collar out of fur making it a little bigger all round than the original, then fused some lining for the backing cutting it just slightly smaller than the fur. After sewing the two halves together (great tips for sewing fake fur here), I slipped the new fur collar over the orginal one and slipstitched it in place, so it can easily be removed for cleaning.
There was enough fur left over for cuffs as well (and maybe a little ted one day...)
Now, I know ir’s not a dress, but I thought it would be fun to enter it in the lovely Julia’s Mad Men challenge.
The challenge required I submit a photo of myself wearing the garment. Not being one to take or post selfies, nevertheless I shortened my hair, got myself dolled up and here it is:
Awkward! - and melting - 22°C (about 72°F) at time of photo
- it’s nearly May, for goodness sakes! 
The hat was made by nana (she was a milliner) and a bit too fragile to wear anymore. The handbag is also from her. Gloves from Molly N.
If you look closely at the buttonholes, you’ll see I trialled a new technique called Spanish Snap Buttonholes. Easy, peasy! I’ve a tutorial here.

Monday, April 8, 2013

Stashbusting 1, 2..!

... a new work-appropriate skirt with pockets in the side seams.
The navy blue wool was left over from a nehru-style suit I made ages ago for SunnyJim, and the lining was left overs from the lining used in this.
I made the pattern as well, and was orginally going to topstitch the basque, but after trying it on I decided it was unlikely I’d ever wear the skirt with it visible so didn’t bother. Because the wool’s fairly heavy and stiff (which i knew would make the pleats stick out a bit) I made the basque quite deep to reduce bulk around the hips and tummy.

Tuesday, April 2, 2013

Stashbusting 1…!

I’m a little late joining in, and a little outside the monthly challenges, but hey, I’m making out of the stash, which counts, right?
And yay, I’m using a different pattern! New Look 6144
I have plans to make it up in a peice of green wool I bought last year from the Fabric Warehouse during one of their sales (only went in for lining, darn-it!)
But first I toiléd it as a top (no waist darts) in a piece of scrap fabric that was orginally used here and in the back, a vintage blue metal zip - love it!


Thursday, March 14, 2013

Rain, rain, come this way

Wellington has been experiencing the most glorious dry, sunny summer its had in 66 years. However, as there has been no significant rain in almost four months, (and one storage lake empty for earthquake strengthen since spring) there's now a total ban on outdoor water use (eg, cleaning the car, watering the garden) and we've also been asked to reduce personal water use by about 30 litres per person per day - thats about three minutes less in the shower, or ten half-flushes less of the toilet!
All this nice weather has seen me spending a lot of time outdoors, away from the computer and sewing machine, trying to shape the jungle that is my backyard into some sort of usable space. I seized the opportunity on the one slightly overcast day we’ve had to cut out a new winter jacket - of course with a little help. Here’s Sootsta demonstrating the ancient technique of cattus in unguem configere posset in exemplar (cat-claw-pins-the-pattern) leaving me no option but to retaliate with also very old simulant ad legere in nuntius-papyrus (pretend-to-read-the-newspaper) distraction technique.

And thank you to cation designs for the Sewing with Cats blog award. I'm honoured to receive it.