Monday, April 22, 2013

A béret for the dawn parade


Some of you may remember I rediscovered a jacket, made when I was 14, a few years ago and with a little tarting-up it’s back in my wardrobe.
Cleaning up in the weekend, I found the left-over fabric, so spent an enjoyable few hours on Sunday crafting myself a new béret. I used a pattern made years ago while studying milinery, but this one is similar (plus it has a tutourial). I plan to wear it to the dawn parade on Anzac Day (Thursday).
Kanzashi flowers (purple brooches clipped to hat) were from another project. The blue flower was made simply by turning through a bias strip of fabric and shaping into petals.
Brooch clips available from Made on Marion.

Wednesday, April 17, 2013

Stashbusting 1, 2, 3!

About 20 years ago, I made myself a dress from a length of scarlet red wool crepe in Vogue 2586 (View C). Much loved at the time, the dress was eventually packed away when I - ahem - outgrew it.
Fast-forward to last year, and in a fit of - well, maybe just a fit - I unwisely decided to chuck the bits of now unpicked dress into a dyebath (mistake no1 - never dye something thats been worn repeatedly - even if its clean - as its probably got residue stains not visible, but boy, are they there!) after I had already dye something else (mistake no2 - first article has already absorbed the best part of the dye). Result = lovely tonal version of the orginal colour, but blotchy, blotchy, BLOTCHY! Doh! Into the stash it went.
Anyway... after checking out this (linked to JuliaBobbin's Mad Men Challenge from last year) I had to have that pattern - Vogue 5782. The only one I could find online for sale was two sizes too big - but I know how to grade a pattern and I had to have it.
Pattern duly graded, I pulled the blotchy wool crepe out of the stash to toilé it in, figuring if I made it shorter and cut really carefully I’d be able to avoid the worst of the dark splodges, and maybe end up with a top I could wear.
You may notice there’s a seam across the bust. Because the front is cut on the bias, none of the bits I had were quite long and wide enough to cut it in one piece. As the bit I most needed to check on the toilé was the drape of the neckline, of course it had to stay on true bias, hence the seam. Also, the ties on the pattern are sewn into the side waist seams, but I extended these pattern pieces to make an actual belt.
It was impossible to avoid all the splodges though, so I’m thinking of perhaps tie-dyeing it somehow, although I do love the colour it is now. In the meantime, I’ve worn it a few times at night to dimly lit restaurants and a concert and no one seemed to notice. Really comfortable style, and can’t wait to make it in the ‘real’ fabric.

Tuesday, April 16, 2013

How to make Spanish Snap Buttonholes

Hey, you can teach an old dog new tricks!
I’ve been making bound buttonholes for years, but have often been frustrated at how large the “lips” are, no matter what I did to make them smaller.
Then last weekend I discovered Spanish Snap Buttonholes in a book I’ve had for ages “Couture - the art of fine sewing” by Roberta Carr. Now, I have to admit, I often overlooked this book in favour of others in my collection because of the photos inside - eyewatering 1980’s outfits (be aware!). I’m taking a fresh look at it now to see what other techniques it contains for future use.
I found these buttonholes were much easier to make than regular bound buttonholes. Here’s how:
First, make a oval template on a bit of cardboard 7.5cm (3 inches) by 5cm (2 inches). Make a rectagular box first, mark in centre lines and freehand the curves.
Find the true bias of your fabric (absolutely crucial to use the bias so the lips wrap correctly) and on the wrong side chalk the bias line, or use a basting stitch if you prefer. Centre your oval template longways on this line and mark up as many ovals as you need for buttonholes, plus one for a trial run.
Once you cut them out, mark the centre point of each oval, then measure and mark half the width of your button on each side of this centre point (longside). Mark out 3mm (1/8 inch) each side of centre point (shortside). These are the points you’ll stitch to in curved lines. You can chalk/baste the whole stitching line if you like.
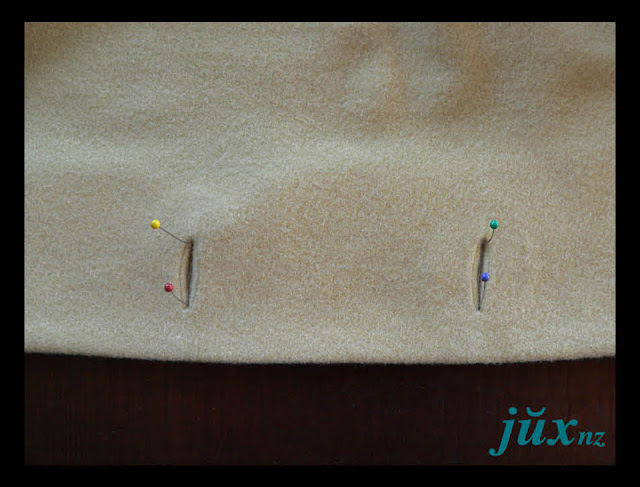
Next, mark the position of the buttonholes on the right side of your garment. Centre each oval wrong side up over this line in the correct distance from the front edge for the size of your button; pin in place. In this example, my buttons are 28mm, therefore the ovals sit 1cm in from the front edge. (If they were much smaller, I imagine the ovals would extend past the garments edge.)
Now, using a small stitch length on your machine, stitch an ‘squinty eye’ shape with pointy ends. Slash through the centre and out to the points, being careful not to cut the stitching.
Turn through to the wrong side of garment, take hold of each end of the oval and tug once in a firm ‘snap’. Voila! The bias will wrap neatly around the seams and you have made a lovely buttonhole.
Press. I found I could press them to either have no lips or really narrow ones (which are demonstrated here).
If necessary, trim oval to sit back from the seam allowance.
(Ms Carr suggested pressing a little fusible web at each end to keep in place, but I didn’t bother, because once they’re stitched to the facings they’ll hold in place.)
As you can see, I’ve now sewn my jacket and attached the facings, but not the lining.
To make the buttonhole facings, place a pin in the corner of each buttonhole, right through the facing.
Flip the garment over and chalk/baste the buttonhole points onto the facing, using the pins as a guide. (If you look closely, you’ll see yellow-head pins pointing to my white chalk marks).
Cut retangles of fusible interfacing 7.5cm (3 inches) by 5cm (2 inches) – use those scraps you’ve been saving! Chalk/baste buttonhole markings onto the sticky side of the fusible, and pin to the facing, right sides together.
Once again, using a small stitch length on your machine, stitch an ‘squinty eye’ shape just past the chalked/basted points of the buttonhole. Before you cut, pin through the buttonhole to check again they’re lining up, then slash through the centre and out to the points, being careful not to cut the stitching.
Push the fusible through the hole, and trim to sit within the seam allowance. Carefully press fusible to the facing. (Of course a cat had to get in at least one picture!)
Line up your buttonholes and facings and pin and/or baste.
When you have finished your garment, slip-stitch the facings to the buttonholes.
Gorgeous!

Monday, April 15, 2013

Mad men challenge - Beth's fur collar coat

It’s finally rained a bit in Wellington, enough for the water restrictions to be eased - yay!
It seems a bit ridiculous making a wool jacket (Burda 7255) at the moment because its still very warm here for this time of year, but the jacket was going together like a dream – until the end – when I put it on the mannequin and realised it lacked a little something...
Taking a break, and catching up on some of last seasons Mad Men (new season starts soon!), I spied this:
(source)
My eyes flicked between Beth and the mannequin - that’s it! That jacket needs some fur!
So off to Spotlight I went the next morning and bought 30cm (12 inches) of fur in the closest colour - teddybear fur.
I re-cut the top collar out of fur making it a little bigger all round than the original, then fused some lining for the backing cutting it just slightly smaller than the fur. After sewing the two halves together (great tips for sewing fake fur here), I slipped the new fur collar over the orginal one and slipstitched it in place, so it can easily be removed for cleaning.
There was enough fur left over for cuffs as well (and maybe a little ted one day...)
Now, I know ir’s not a dress, but I thought it would be fun to enter it in the lovely Julia’s Mad Men challenge.
The challenge required I submit a photo of myself wearing the garment. Not being one to take or post selfies, nevertheless I shortened my hair, got myself dolled up and here it is:
Awkward! - and melting - 22°C (about 72°F) at time of photo
- it’s nearly May, for goodness sakes! 
The hat was made by nana (she was a milliner) and a bit too fragile to wear anymore. The handbag is also from her. Gloves from Molly N.
If you look closely at the buttonholes, you’ll see I trialled a new technique called Spanish Snap Buttonholes. Easy, peasy! I’ve a tutorial here.

Monday, April 8, 2013

Stashbusting 1, 2..!

... a new work-appropriate skirt with pockets in the side seams.
The navy blue wool was left over from a nehru-style suit I made ages ago for SunnyJim, and the lining was left overs from the lining used in this.
I made the pattern as well, and was orginally going to topstitch the basque, but after trying it on I decided it was unlikely I’d ever wear the skirt with it visible so didn’t bother. Because the wool’s fairly heavy and stiff (which i knew would make the pleats stick out a bit) I made the basque quite deep to reduce bulk around the hips and tummy.

Tuesday, April 2, 2013

Stashbusting 1…!

I’m a little late joining in, and a little outside the monthly challenges, but hey, I’m making out of the stash, which counts, right?
And yay, I’m using a different pattern! New Look 6144
I have plans to make it up in a peice of green wool I bought last year from the Fabric Warehouse during one of their sales (only went in for lining, darn-it!)
But first I toiléd it as a top (no waist darts) in a piece of scrap fabric that was orginally used here and in the back, a vintage blue metal zip - love it!